Although the FA shares the same F-mount but there are some modification done with the lenses before the FA was made available. Don't worry, the mount still takes older lenses (Even with the latest AF Nikkor), only compromise is you may not be able to take the FA to full flight in all the automatic features provided. But good news is, the FA needs only a minimum specification of an AI modified Nikkor lens to work.
Oh, that is one more thing, since the Nikon F mount was first introduced in 1959 in the Nikon F camera, it has gone through some changes in upgrading. In 1977, all Nikkor lenses were made to have automatic indexing (AI). The very old Nikkor lenses, however needs to do a AI conversion before they can be used in automatic indexing in the FA. This was attributed to the decision of having a fixed meter coupling lever in the lens mount (Thus, the familiar tiny retractable meter coupling lever release button just next to the lens mounting index has been removed).
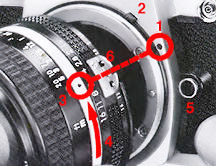 |
When mounting a lens to the camera, first, line up the aperture/distance index on the lens (3) with the lens mounting index on the camera body (1). Then twist the lens mounting ring counterclockwise (4) until the lens clicks into place. Confirm that the aperture/distance index is right on top. The FA comes with a fixed meter coupling lever (2), thus, only AI, AIS or current AF lenses can be used with the Automatic Indexing feature. |
To change a lens, while pushing the lens release button (5), turn the lens mounting ring clockwise (7) until it reaches the lens mounting index mark (1) and you can lift the lens off. Be very careful when you are changing lenses with film loaded in the camera, be careful not to expose the mirror box to direct sunlight. |
 |
It is not a good idea to load a film into your camera immediately when you had a camera back from the shop. Always take sometime to get familiar with the operations and controls before you do that. But should you need to do so, you need to open the camera back. Every camera manufacturers design their way of opening the back in a universal manner, except during the early days of trying and searching for the most functional, responsive and safest way for users. For instance, the early Nikkormat cameras have their back opening lever at the lower portion of the camera which you may spend sometime to locate.
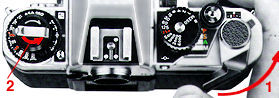
However, the FA, as with many other Nikon bodies, the opening of the filmback has a safety lock. Locates at the center of a large ring (the Exposure compensation/ISO filmspeed dial) on the left hand side of the camera. First you need to push the camera back lock lever (1) counterclockwise with your finger, pull up the film rewind knob (2). Then lift up further until the camera back pops open. The safety lock feature is designed to prevent accidental opening of the camera back. |
 |
With the back opened, you may load a film into the film chamber. Pull the film leader and insert the film leader in the takeup spool. Pull the leader across the camera and insert it into any one of the slots in the takeup spool. BUT caution: After the back is open, you must be extremely careful NOT to touch the exposed shutter blades/curtain especially with the film running across and covered the curtain (When you may forget the shutter is just right undernealth the film), the curling film leader when first pull out from the film catridge also may easily scratch across the thin layer of shutter blades. I have seen too many careless handling resulting in damaged or deformed shutter curtain, this applies on any cameras. Although the auto film advancing features available in most modern cameras make this a less daunting experience. NEVER attempt to use any force if you load the film unsuccesully.
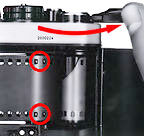 |
Make sure that the perforations along the edges of the film mesh with the sprockets. If necessary, release the shutter by pushing the shutter release button, and stroke the film-advance lever slowly to make sure that the leader winds smoothly on the spool and that the film edge perforations engage the film sprocket roller. When you are certain that the film is being fed properly onto the spool and traveling correctly along the film guide rails, close the camera back by pressing it until it snaps into place. |
There is only one way to
test for proper film advancement. You should confirm proper loading to avoid
unnesssary "embarrassment" after finishing your photo session at frame 37+ or
worst still, presenting blank and unexposed roll later for processing. To
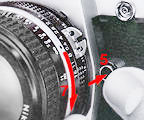
confirm, just fold out the rewind crank and turn it in the direction of the
engraved arrow indicates until some resistance is felt. Now, if the film is
properly advanced by take a look at the rewind lever (2) will rotate when you advancing a
frame or two (1) before
setting on course to the frame number "1".
 |
Up to this point, the Nikon FA was indeed packed with some very considerate features. First, the camera will automatically set the shutter to 1/250 sec manually during the initial first few frames until you reach frame number 1 in the exposure counter. This also apply when you have any dedicated Nikon flash mounted on the camera. |
Most of the
earlier Nikon bodies like the earlier automatic Nikkormats, and the FE camera
were not equipped with this feature and thus. If accidentally you have your
lens cap on your lens or trip the shutter in a dark environment, the shutter
may assume it is very dark and the automatic exposure will determine by the
wrong reading and set a extra long exposure. You have to turn the shutter
speed ring to the manual shutter or the mechanical back up speed of M250
before the shutter will release.
After making sure the film is
correctly taken up (By watching the rewind knob turn (2)), few blank exposures will advance
the film to counter "1," and fresh film inside the camera is ready to be
exposed.