One of the most made mistakes in SLR photography is the wrongly adjustment of ASA/ISO film speed setting, especially to those whose works always demand changing various types of film. This was patched by a combined effort from camera and film manufacturers with the implementation of the film speed DX-Coding system in later years. Virtually all current autofocus cameras on the market has this feature as standard for less errors and more responsive photography. While we acknowledge the contribution of this mechanism in the course of development of camera design, very few manual focus cameras has this feature incorporated. The Nikon FA is no exception. In fact, DX coding was first seen in a Nikon body in 1985. The F-301 finally has this 'modern' feature along with the an integral winder built in the body, this is also another first in a Nikon.
Setting the Film
Speed
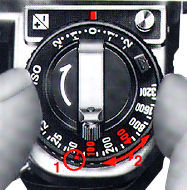
The film
speed dial for film speed adjustment is located directly under the rewind
knob. It is set for the appropriate film speed by lifting the ring (2) and turning it in either direction
so that the film speed index (1) is aligned with the desired ASA/ISO
setting.
 |
Why is this adjustment important ? Because to program the camera to give the correct exposure with a particular film, you must set the camera to the correct film speed. If you have loaded a film with ASA/ISO 100, just make sure the film speed setting is alligned to '100'. If you have loaded a film with light sensitive, say ASA/ISO 400 and forget to adjust the setting, an error of this will cause ALL exposures in your film and underexposued by two stops ! |
For rapid reference, the red index dot is marked red. So does the two most commonly used film speed in 100 and 400. The scale on the ASA/ISO dial has settings from ASA/ISO 12 to 4000. Two lines between each number stand for intermediate settings, such as 64, 80, etc. The film speed, indicated by an ASA/ISO number printed on both the film carton and cartridge, is a numerical rating of the film's sensitivity to a given amount of light: the higher the number, the greater the sensitivity, and vice versa.
 |
You have to have a rough idea how this works. Because, apart from serving its main fucntion, some seasoned photographers use this to 'compensate' and 'fool' the camera exposure meter reading for a given subject of high contrast range. e.g. if you are using ASA/ISO 100 film, intentional setting of the film speed to '200' will be one stop under exposure and if that was adjusted to '50' will compensate the exposure by one stop over-exposure. Only a handful of top notch AF cameras allow you to manually over-ride the automatic DX coding in the camera now. |
 |
Warning Make sure that the exposure compensation dial is set at neutral point i.e.'0'. If not, turn the dial until the 0 click stops opposite the red index line while depressing the exposure compensation dial locking button . The command center for operations in the Nikon FA is mainly concentrate on the right hand side of the camera. |
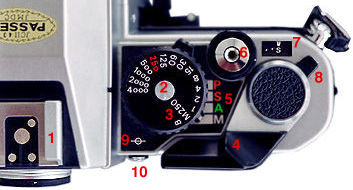
Apart from the centre, where the flash accessory shoe for flash (1) locates, the right portion of the camera has the main shutter speed ring for variable shutter speed settings (2), including the dual mechanical back up speed in M250 and 'B' (3); the film advance lever which doubled as Shutter lock (4), the four exposure control modes (5) in 'P' (Dual Program AE), 'S' (Shutter Priority AE), 'A' (Aperture Priority AE) and 'M' (Manual Exposure). The threaded shutter release button also acts as a meter turn-on button (6) and next to it are the exposure counter (7) which keep you inform number of expsoure left/taken and also the multiple exposure lever (8) which you can handle in one hand operation. The tiny symbol just below the shutter speed dial is the film plane indicator (9) and another button just below it is the shutter speed dial lock button (10).
You are always encouraged to refer to main reference map for cross references before you are totally familiarise with the camera. I don't simply cook and prepared 'meal' like that without an positive purpose.
As earlier sections, we have discussed the film advance lever, the shutter release button and the exposure counter that are relative to loading and unloading the film. So the next section, we will commence on the other features.