The four colour settings
just next to the the shutter speed dial presented by individual alphabet 'P',
'S', 'A' and 'M' are the exposure control mode selector. These represent the
four basic exposure control modes available in the Nikon FA (Flash is another
one, but it works with all these four settings with different ways). The
respective 'P', 'S', 'A' and 'M' are representing Dual programmed AE), Shutter
Priority AE, Aperture Priority AE and Manual Exposure
controls.
Confuse again ? Because the FA is an automatic camera, depends on your needs
and experience, you can use either one of these four modes to get a pretty
good and well exposed pictures. Moreover, the FA provides not one but two
meterng systems to handle metering. The center weighted metering are available
in ALL the exposure control methods, while the automatic multi-pattern
metering system
(AMP) can be use in all three automatic modes (In manual mode, only the center
weighted metering is provided) to ensure a reasonably good exposure even in
difficult lighting situations.
Each exposure mode has its own
advantage, so does the metering system.
Metering System in
the Nikon FA
Virtually all cameras
has a metering system to give you a guide what should be a theoretical
'correct' exposure. These data are measured by a light sentitive metering
cell(s) that incorporated in the camera body. A neutral reference point is a
metered value reflected from a 18% grey card. Anything above is termed as over
and data measured below is considered as under exposed. Well, this is the
older way of average metering - it measures the across the whole picture frame
and return with a suggested data. Since most pictures have their subject of
interest around the center of the picture frame, the center portion was give
some priority - that is how Nikon's termed their metering system as 'Center
Weighted Average Metering System'. That method was used since the Nikon F
Photomic TN and he Nikkormat FTn in 1967. The Nikon's viewfinder has a unique
12mm circle, which gives you the outline of where the priority of measurement
given in a 60/40 composition. (Priority of 60% was given within the 12mm
circle and the rest was given 40% average measurement). But the Nikon FA
changed the combination to even more precise 75/25 instead of the 60/40 (Nikon
F3's metering was the first to change in 80/20 combination).
The Nikon FA has two
options: the conventional center-weighted or a 'new' matrix metering - in the
early days of FA, Nikon termed that as 'Multi-Segment Metering System'. When
Nikon introduced the FA they introduced to the world of this revolutionized
matrix metering. Both of these metering systems employ TTL (Through the lens)
full-aperture exposure metering. This means that light passing through the
lens is measured at full aperture therefore the viewfinder image is at its
brightest until the moment of exposure.
The 'new' Matrix
Metering System
This innovative metering
system, along with other well-pleased combination, won some judges' heart and
thus, the Nikon FA was crowned as 'European Camera of the Year'. It proved to
be a trend setting technology over the years and was much copied by even the
competitions. Nobody doubts the fact Nikon has its leading edge in terms of
metering technology - until today (The Nikon F5 has leapfrog this pioneered
technique to new heights with its patented RGB 'color matrix
metering'.)
While technological
advancement, more perfect techniques were introduced, the FA's original
concept stays the same, but today's high-tech matrix system is so much more
sophisticated. In the matrix metering mode, the camera meters five
areas- one corresponding to the
viewfinder's 12 mm-diameter center circle and each of the viewfinder's four
corner quadrants. The exposure data will then be relayed to the camera's CPU,
where it is evaluated and compared with accumulated and programmed exposure
scenarios to suggest a 'good exposure' reading or exposure will be
made.
How reliable is the matrix
metering ? The early
days I can hear users voicing out with some differences of opinion expressed.
While the metering works well in many 'difficult' situations, but if you are
concerned, I am sure you will made some back up by varying some expsoures.
Although I have never seriously tested it, but generally it helps a lot where
factor of exposure is secondary, meaning to say, fast and responsive
photographic situations. But as I said, if you are not comfortable, there are
many other means of exposure compensation methods available. Anyway, as far as
comfort level is concerned, this is very subjective, I am leaving this part
for you to tell in the message board.
 |
 |
 |
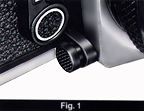
How to set the two metering system ?
There is a Metering Control Button (Fig.1) located at the bottom section of the camera, just next to the lens mount and below the self-timer lever. You can vary the two metering system and change from one metering method to the other between the center-weighted or the multi-patterns matrix metering with this button.
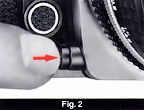
In its normal "out"
position, you cannot see the red index. In this position, the automatic
multi-pattern metering method is automatically operating with the camera set
at any of its automatic modes (P, A, or S) and with an AI-type Nikkor lens
(AI, AI-S, Series E, and even the
latest AF lenses) mounted on.
At any time, you
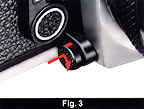
can change to centerweighted metering by simply pushing in the button (Fig 2).
To lock it in position, holding the button as you rotate it clockwise until
the red index faces up (Fig 3). With the button at the "in" position, meterng
is always center-weighted. The center-weighted metering works in all the M, P,
A, or S mode.
Note:
Regardless of the position of the button, metering s always
center-weighted in the manual mode or when attaching a lens other than an Al-S
Nikkor (Including the AF Nikkor), Al-Nikkor or the Nikon Series E
lens.
What if the
metering control button is set to matrix and the shooting mode selector is in
the M position ? The camera will automatically set to default in
center-weighted metering then.
*There are additional info relative to these two metering system in the FA.
Duplication Work and Photomicrography
In copy work, slide duplication, and photomicrography, you must make exposure compensation with centerweighted metering, because these types of photography represent unusual contrast situations. Some lenses automatically switch the metering method to centerweighted. The table below shows the relationship between specific types of photos and proper exposure. Since this is meant to be only a guide, in practice you should make further compensation by experimentation until you achieve the proper results.
1) The exposure
compensation values listed below are reference data obtained when general
purpose film was used. With color reversal film or microfilm for duplication
work, it is advisable to take additional shots with + one stop exposure
compensation as these films have very small exposure latitude.
2) To avoid
vibration, you can make the exposure by turning the illuminition on and
off.
3) It is advisable to use a cable release to eliminate camera
vibration.
|
Subject |
Method of exposure |
Exposure compensation |
Required accessories |
Remarks | |
|
Copy work |
Photographs and pictures with continuous gradation |
Full -aperture or stop-down |
Compensation not necessary |
Micro Nikkor 55mm f/2.8; |
For high contrast subjects, use of an 18% reflectance gray card in determining exposure is recommended With the card, no exposure compensation is required regardless ot whether the background is black or white |
|
Documents and drawings of high contrast |
Approx. + 1 to + 2 slops ror black letters on white background: approx. -112 to -1 stop for white letters on black background. | ||||
|
Slide duplication |
Slide with continuous gradation |
Stop-down |
Approx + 1 to +2 stops |
Micro-Nikkor 55mm f/2.8; |
When using Nikon Sl de Copying Adapler PS-6, set the flood lamp 30cm away from its opal plate |
|
Slide of documents and drawings photographed |
Approx + t-1/2 to +2-1/2 stops for black letters on white background. | ||||
|
0 to approx -1 /2 stop for white letters on black background | |||||
|
Photomicrography |
Prepared specimen |
Stop-down |
Approx. +1 stop |
Microflex PFX |
Generally, results come out better w th more exposure in photomicrography. The compensation value on the eft is only a guide: determine the compensation value by test shooting |
| Back | Next | Various Exposure Control Methods 5/13 parts