Aperture Priority AE
(A) Mode
Select
the lens aperture first; then the FA's microcomputer selects the matching
shutter speed for you. This mode is recommended when the rendition of depth
must be controlled exactly. For instance, you may want to blur out the
background in portraiture or make everything come out sharp in scenic
photography. But the biggest advantage in the FA is, it is compatible with
virtually all AI, AI-converted, E series, AI-S and even the current AF lenses
with no adjustment necessary Basically, it operates the same manner as a FE2
but with an added advantage of matrix metering in additional to the
conventional center weighted metering.
 |
 |
 |
1. To setup the FA in this mode, first set the mode selector to A.
2. Set the lens to the desired f-number. Although each number on the lens aperture ring has a click stop, you can also set the ring to intermediate settings. Note that small apertures give greater depth of field, while large apertures restrict the zone of sharp focus to the main subject. The shutter speed dial can be set at any position except M250 and B.
3. Confirm that automatic multi-pattern metering is in operation by making sure that the metering control button is in the normal "out" position and the red index is not on top. You can also use the center weighted metering with exposure lock and exposure compensation dial for fine tuning exposure control.
 |
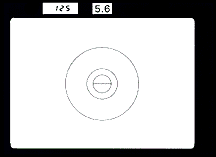
4. Look through the viewfinder and check the exposure information. The aperture you set will shown through the ADR window). When the shutter release button is depressed halfway, the LCD shows the shutter speed selected by the camera to obtain correct exposure with the aperture you set. If necessary, use a wider aperture to prevent a slow shutter speed from causing blurred images. |
Warning Indications
If the LCD shows 'HI', this means the scene is too bright and there is no shutter speed to match the aperture you selected. In this case, overexposure may occur. To prevent this, stop the lens down until 'HI' disappears, if all else fails, attach a polorizer (lowering 2 stops), a neutral density (ND) filter to the lens (Different grades) or change to a slower speed film as the last means.
![]()
If the LCD displays 'Lo', the
scene is too dark and there is no shutter speed to match the aperture you
selected. In this case, underexposure may occur. To prevent this, select a
wider aperture or a faster speed lens or, if necessary, attach an electronic
flash as supplementary artificial light source. As a last resort, change to a
faster film.
![]()
In the aperture priority
mode, only these two warning indication is provided. If you have seen any
other like the 'FEE' symbol appears in the LCD, most probably you have set up
your FA in a shutter priority or you are in programmed modes. Anyway, as most
earlier Nikon bodies are using aperture priority AE as their prime automation
method prior to the FG and the FA, an experienced Nikon user should not have
any problem handling this mode.
The Nikon FA's 12L LSI controls shutter
speed steplessly
from 8 sec.to 1/4000 sec. and shutter speed indicated on the dial (except the
M250 and B) are available with pin point timing accuracy assured by a 32.8k hz
quartz oscillator. Nikon cameras have been featured in this site using the
Aperture Priority AE are F3, Nikkormat EL, EL2, FE, FE2. You may cross check
with these site for comparison.
M Mode (Manual Exposure
Control)
In the
manual mode, you set both the shutter speed and aperture manually according to
the desired effect or in situation where you intend to lock in a certain
reading for sequential shooting. Necessary key exposure information is shown
in the viewfinder. With this mode, it's possible to create intentional over-
or underexposed photos. It's also good under specific shooting situations.
Time exposures at the B setting or mechanical release at M250 are performed in
the manual mode. Flash photography with flash units other than Nikon dedicated flash units should
also be recommended to perform in this mode.
This mode, when works independently, is just like operating a Nikon manual FM/FM2(n). Except that it is more precise in its shutter speed, because in the manual mode, all speeds are quartz controlled while the FM series bodies are timed mechanically.
Setting up the camera to
handle manual exposure in the FA is equally easy.
 |
 |
 |
1. Set the mode selector to M.
2. Set the lens to the desired f-number. Although each number on the lens aperture ring has a click stop, you can also set the ring to intermediate settings.
3. Set the shutter speed dial to the desired shutter speed. The numbers on the dial are reciprocals e.g., 4000 means 1/4000 sec etc. The 250 engraved in red indicates the fastest sync speed for an electronic flash unit. Although the mode is called 'manual', but each setting has a click stop and shutter speeds from 1 to 1/4000sec. are electro-magnetically (Quartz actually) controlled while the FA's shutter is mechanically controlled at M250 and B.
Note: The shutter speed dial should not be set between click stops when you are in manual mode. Fine adjustment of the exposure should be performed by adjusting the aperture ring instead. In the M mode, regardless of where the metering control button is set, the meter uses only the center-weighted metering pattern. In the M mode, there are no warnings given other than the -/+ indications.
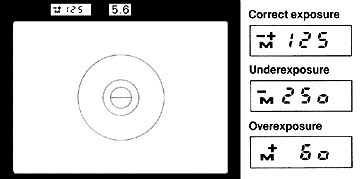
The viewfinder changes
accordingly when you are in the manual exposure control mode. Since it is a
direct relation between aperture and shutter speed, both information are
displayed. Other secondary info in the viewfinder are the flash ready light
when you have mounted an dedicated flash unit on.
 |
Center your main subject in the viewfinder and check the exposure information. Remember that in the manual mode, Centre-Weighted metering is always in operation regardless of the position of the metering control button. The selected f-number is shown through the ADR window. When the shutter release button is depressed halfway, the LCD shows the selected shutter speed preceded by the letter M.
If the -+ indication is displayed above the M, you will get the correct exposure with the selected combination of aperture and shutter speed. If only - is shown, this indicates possible underexposure: use a wider aperture or a slower shutter speed. If only + is shown, this indicates possible overexposure: in this case, use a smaller aperture or faster shutter speed. If the symbols -+ blinks occasionally, this indicates a theoretical correct exposure is within +- 1/3 stop. Exposure fine tuning can be done either by adjusting the apertures or if you wish, you can use the film speed dial and adjust the ASA/ISO film speed value to obtain a more precise reading or adjustment. (Warning: Remember to readjust the dial back to neutral or the right film speed setting after use).